


Many ladies are disappointed when they put on a new wig and it doesn't look natural. But what they don’t know is that it could take some work to get the wig to look realistic and seamless.
One of the most important things to do to a wig once you get it home is to pluck it. Plucking a wig is an art that takes practice, but anyone can do it. In this article, we’ll tell you exactly how to pluck a wig so you can flaunt your wigs with confidence. We’ll fill you in on the wig-plucking process in detail, the benefits of plucked wigs, and more!
Examine the Wig: You May Need to Bleach the Knots First

When you first get a wig home, take a look at the knots at the base of the hair. If the knots are obvious, you need to bleach them before plucking. Bleaching your knots first will reveal some bleach-resistant knots that you’ll need to pluck in a later step. If you wait until after plucking your wig, you’ll have to take time go back and pluck those bleach-resistant hairs.
Bleaching knots is fairly straightforward, requiring you to mix up a bleach paste, apply it to the underside of the wig lace, wait about 15-30 minutes, and then rinse it away. Yet, many people end up with overbleached or underbleached knots due to bad technique. If you want step-by-step instructions for how to bleach your wig’s knots, check out our bleaching knots guide.
Why and When to Pluck a Wig
It can be difficult to determine when and why you should pluck a wig, so we’ll get into that here. A wig should be plucked to give your wig the look of a natural hairline - after all, the first thing that people see when they look at your wig is your hairline.
Oftentimes, wigs come with a hairline that’s straight across, too far forward, or too dense. To fix that, you can use tweezers to pluck your wig to mimic your natural hairline. When plucking is done right, your wig will look like it’s growing from your scalp and the density of the front of the wig will be similar to natural hair.
If your wig came pre-plucked, you won’t need to pluck it unless it doesn’t look right with your face or isn’t plucked well. If you decide that your wig knots need to be plucked and bleached, you should wait to pluck the wig after you’ve bleached the knots. If you don’t need to bleach the knots, feel free to pluck your wig right after unboxing it.
How Long it Takes to Pluck a Wig
The amount of time you need to set aside to pluck your wig will depend on your skill level and how much plucking is required. If you’re totally new to plucking wigs, it will take you longer to pluck your wig than someone who has experience. But as a general guideline, it could take you a half hour to an hour to pluck one wig. But with considerable practice, you can easily do it in less than a half-hour.
Tools You Need to Pluck a Wig
Now that you know a little about plucking a wig, let’s get into the how-to portion of the article. Before you get started, gather all the tools and products you’ll need to pluck a wig:
1. A styrofoam or fabric wig stand
2. T-pins
3. A rat-tail comb
4. Tweezers
5. Clips
6. Styling mousse
7. Wide-toothed comb
8. Wig brush
9. Large butterfly clip
10. Eyebrow razor (for baby hairs)
11. Spray bottle (if you want to pluck your wig wet)
When it comes to plucking wigs, you have two options. You can pluck your wig on a wig stand or on your own head. Overall, the choice is yours.
Decide How Much You Need to Pluck
Deciding how much hair to pluck is extremely important. If you start plucking without planning this out, you could end up plucking too much, ruining your wig.
To determine how much you need to pluck, take a look at your natural hairline. Most women’s hairlines recede (or curve) at the temples and don’t incorporate any completely straight angles. So, one of the main goals when plucking your wig is to soften up any harsh lines or angles.
In addition, you should pluck to debulk the front of the wig if needed. Use your natural hair density as a guide if you’re not able to get a feel for it otherwise.
We’ll give you some helpful tips for how to section off the hair for plucking in the following sections.
Step by Step Guide: Pluck on a Wig Head/Mannequin Head
In this section, we’ll give you step-by-step instructions for how to pluck a wig on a wig head or mannequin head. Beginners may have an easier time using a wig stand because it enables you to clearly see what you’re doing. You get to move the mannequin's head backward and side to side to get a good look at how much you’ve plucked and how much more you need to pluck.
Step 1: Put Your Wig on a Wig Stand

Unbox your wig and place it on your wig stand. Imagine that the wig stand is your head. The front of the wig should sit where your hairline begins on your head and the back of the wig should sit where the nape of your neck would be. To keep the wig from moving around, you’ll use T-pins. Stick 8 to 10 of the T-pins into the lace right in front of the wig’s hairline. You can also place a few of them along the back of the wig to further secure it.
Step 2: Prepare Your Wig for Plucking

Now that your wig has been secured to the wig stand. It’s time to do some wig prep. Here are the steps you should follow to prepare your wig for plucking:
1. Begin by gently combing through the wig with a wide toothed comb. Start at the ends of the hair and move upward toward the roots. Doing so will reduce the chances of damage throughout the detangling process.
2. Apply 2 palm-fulls of mousse across the wig’s hairline and then use your rat-tailed comb or a wig brush to smooth the hair straight back. It should look sleek and be contoured to the top of the mannequin’s head. This step will enable you to easily see the hairline of the wig.
3. Gather the hair towards the back as if you’re going to put the hair into a ponytail.
4. Loosely secure the wig in the back using your large butterfly clip.
Now your wig is ready for the plucking process.
Step 3: Take Some Photos of Your Own Hairline
After prepping your wig, pull out your phone and take some pictures of your natural hairline. You’ll use these photos as a reference during the plucking process. The most natural wig hairline for you will mimic your natural hairline.
Make sure to take some pictures both straight-on and from each side. Take the photos outside on a sunny day or in a well-lit room for the best results.
Study the images you just took and note where the hairline recedes. Those are the places where you’ll do the most plucking.
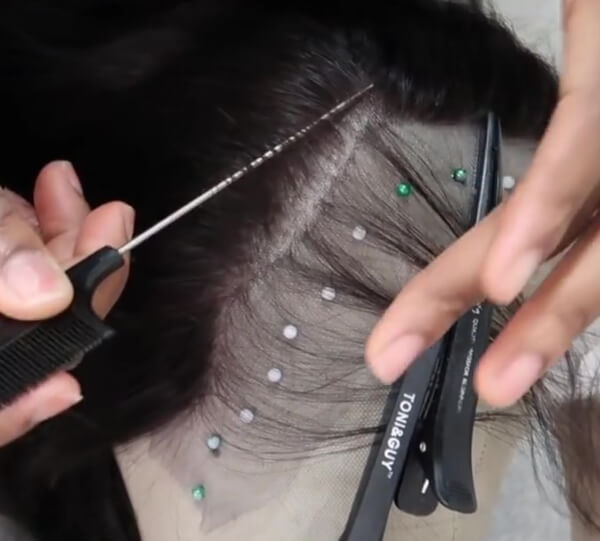
Step 4: Start to Pluck The Hairline

Now, we get to the fun part, plucking the wig. Here are the steps to follow for a painless and precise plucking experience:
1. Use your rat tail comb to carve out the shape of your natural hairline on the wig. You can use either side of the comb that you want. Take your time and part small sections at a time. Take a look at your natural hairline photos every now and again as you do this part to ensure precision.
2. Allow the sections you’re going to pluck to hang down freely. Use clips to hold the rest of the hair out of the way.
3. Look at the part again. Take a few seconds and take a look at the parts you made in the previous step. Make sure that the part is symmetrical and follows the same shape as your hairline. You may need to go back in and re-part it.
4. Begin plucking the hair that you sectioned off. Hold the tweezers in your dominant hand and turn them so that the shorter (less pointy) side of the tweezers is pointing down. This side won’t remove as much hair as the longer side which makes it great for beginners. Keep the following guidelines in mind as you pluck:
- Grab the hairs close to the root without gripping and ripping the lace.
- You can tweeze the hairs in any direction you’d like, but be gentle.
- Pluck away all of the hairs in the sections that are hanging down. You’re not done plucking until there are no hairs left in the section.
Step 5: Go for the Next Layer
Now that the general outline for the hairline is complete, let’s move on to the next step. The goal for the next step is to thin out any bulkiness along the front of the wig. You’ll pluck the sections in layers to keep things simple.
For the first layer, you’ll follow the below instructions:
1. Take the clips out of the hair so that all of the hair is down.
2. Turn the mannequin head to the side so you can begin to pluck the hair on one of the sides.
3. With your rat tail comb, part out a rectangular section about one inch from the hairline. The long side of the rectangle should span from the temple to the ear.
4. Use a clip or two to hold the rest of the hair out of the way.
5. Separate the rectangle in two sections by using your finger to create a horizontal part at the midpoint of the rectangle. You now have two free sections.
6. Pin up the top half of the section and begin plucking starting at the top right corner of the lower section and moving straight down millimeter by millimeter.
① Pluck 3-4 strands at the corner, move down a millimeter and tweeze 3-4 more strands. Continue until you reach the bottom of the section (at ear level).
② After you’ve completed this first layer of plucking, you’ll create a new vertical part to the side of the first layer (a milimeter in width) and repeat the above steps. You should pluck five to six 1 mm layers in the section.
③ If the section has not been thinned out sufficiently, you can repeat this step to thin it out further.
7. Remove the pin from the top half of the section and repeat the previous steps.
8. Pluck layer by layer on the other side of the wig (5-7 layers).
9. Pluck the middle portion of the wig in smaller sections. You may end up with 7 to 10 layers for this section.
Step 6: Creating Baby Hair
If you’re someone who likes sleek, laid baby hair, you don’t want to skip this step. Baby hair not only adds interest and style to your wig, but it also helps to conceal the lace during the styling process.
But all in all, if you’re not into baby hair, you don’t have to do it- it’s your choice!
To create baby hairs, you should follow the below instructions:
1. Put more mousse across the hairline of the wig (2 palm-fulls). Then comb or brush all of the hair backward and secure with a butterfly clip.
2. Part out tiny sections where you’d like baby hair to appear. The sections should be horizontal and extremely close to the hairline (about a millimeter or so). Most people do baby hairs around the temples, sideburns, and near the widows peak of the wig.
3. Use clips to secure the rest of the hair out of the way. You don’t want to pluck too many hairs by accident.
4. Go in with the tweezers and pluck behind the baby hairs you will be leaving out. You can use the same technique as you did with the other sections (pluck 3 to 4 hairs every millimeter). But remember that the baby hairs should be done according to your preference. Pluck as little or as much as you’d like.
5. Shorten the baby hairs. With your eyebrow razor, cut the baby hairs down to about ½ inch or 1 ½ inches long.
Pluck Wig Part
Often, when you buy a human hair lace front wig, you’ll find that it comes with a natural pre-plucked part, whether it be a middle part, side part, or deep side part. Some wigs like 360 lace wigs allow for free parting, where you can part your hair wherever you’d like.
But if you’ve purchased a T-part wig with a fixed part, you may have to pluck it. Here are the steps you need to follow to pluck your wig part:
1. While your wig is on the mannequin head, put a palm-full of styling mousse on the wig where you want the part to be.
2. Part the wig with the rat-tail comb and comb the hair away from the part.
3. Begin plucking the hair one hair at a time from front to back in the direction of the part.
4. If you pluck one line of strands and would like the part to be wider, pluck an additional line. You don’t want the part to be too wide, so we recommend not plucking more than 2 lines.
It’s important to take your time and avoid yanking the hair too hard. It could take 15 minutes or longer to finish plucking your part.
Pluck on Your Own Head
Many people pluck their wigs on their own heads. This isn’t often done by beginners because it can be challenging to position your hands the right way when you’re reaching upwards. Also, it can be difficult to see the hair in the back half of the lace closure.
At the same time, some people really like plucking on their own heads because it allows you to see just how the hairline will look on your head before and while plucking the wig. In fact, some wig wearers find it easier to create a natural hairline if they do it while the wig is on their head.
When plucking a wig on your own head, you’ll follow the exact same steps that we outlined earlier.
The only thing is that you’ll need to prep your wig in a slightly different way. Instead of securing the wig to your mannequin head, you’ll secure it to your own head. So, braid down your hair, put on your wig cap, put on your wig, and secure the lace to your skin with got2b glued hair spray or another adhesive. Once your wig is secure to your head, feel free to go through the step by step instructions we outlined in the previous section.
*We always recommend that beginners pluck their wigs on a mannequin head. It’s easier to see what you’re doing and get the hang of the plucking technique this way. *
Pluck with Wet Hair or Dry Hair?
If you’ve ever watched people pluck their wigs online, you’ve probably seen them do it on both wet hair and dry hair.
Wet hair is easier to manipulate, making it easier to part even layers. But plucking dry hair has one major benefit - it allows you to see how dense the hair is at all times.
Considering the benefits of each, we recommend plucking your hair dry because it makes it easier to get a good result. If you pluck your hair wet, it will look different when it dries and you may accidentally pluck too much or too little hair. Dry plucking is the way to go.
Pro Tips to Pluck Your Wig
You now know a ton about how to pluck your wig. But here are 3 pro tips to get you the best possible result:
1. Take your time and pluck the hair slowly. Once the hair is gone, it won’t grow back.
2. Don’t grab just any old tweezers lying around the house. Purchase some new tweezers that will get the job done.
3. If you’re unsure whether you’ve plucked enough hairs or shaped the hairline correctly, you can place the wig on your head every now and again to check.
Is There a Wig That Requires No Plucking?
Yes, there are wigs that don’t require plucking - you’ll see them advertised as pre-plucked wigs. These wigs come with some of the plucking already done, leaving less prep work for you to do.
What you’ll find with pre-plucked wigs is that some of them are not plucked thoroughly, meaning you’ll still have to do some plucking to make the wig density and hairline look more natural. Our pre-plucked lace front wigs are meticulously plucked to look natural right out of the box.
While pre-plucked wigs can save you time and frustration during the wig prep process, they aren’t the best option. You can take “natural” a step further with a Clean Hairline Wig. The hairline looks incredibly realistic and seamlessly melts into your skin with no plucking, no makeup, no tinting, and no headache. All you need to do after unboxing a Clean Hairline wig is cut the lace and put it on. No one will be able to tell it’s a wig.

The Final Words
Now that you know exactly how to pluck a wig and what to expect during the wig plucking process, we have a question for you. Would you prefer to pluck your own wig or buy a pre-plucked wig? Share your opinion below!
Plucking a wig can be difficult if you’re just starting out, but with the right information and some practice, you can become a wig plucking pro in no time! And don’t forget that with a Clean Hairline wig, you can skip the plucking process completely and go straight to rocking your new look.


